This post is a first in the series about Spring Cloud - a set of Spring libraries for building “cloud native” applications. What are “cloud native” applications? It means applications that have 12 factors. In short: these are applications that are easy to deploy on available cloud providers, easy to scale up/down, monitor and release (with CI/CD).
I will show you how to start from a simple Spring Web project to create a Spring Cloud application at the end.
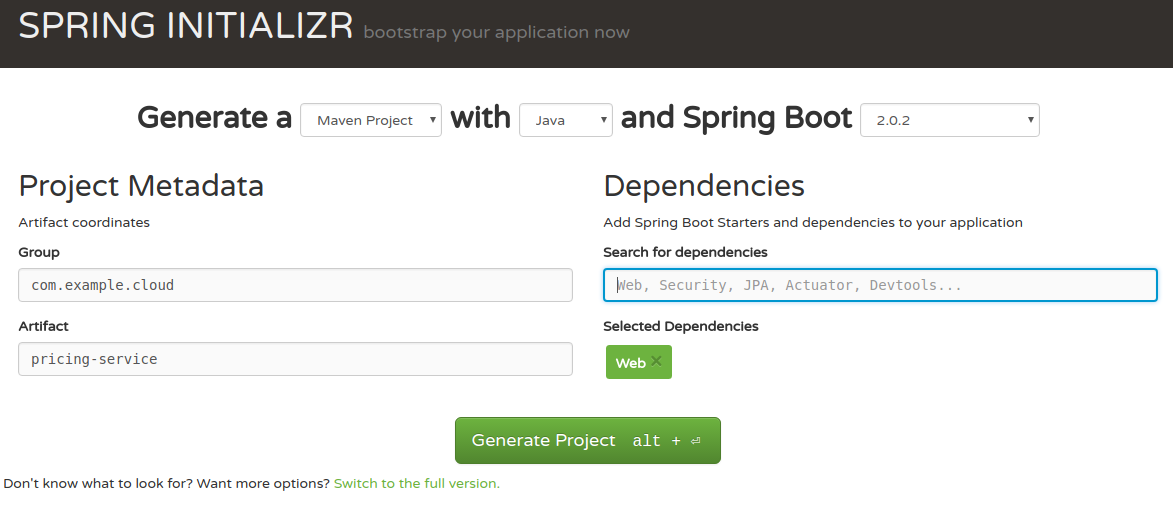
The example application which we’re going to build is a rest API for renting goods (e.g videos). It will return price according to a rental plan and duration.
The project is available at github with each step as a separate branch.
In this post we will create spring-cloud-1 branch.
We will first start from standard Spring web application generated with Spring Initializr at http://start.spring.io
Then we will keep adding cloud features to it, such as:
- centralized configuration with Cloud Config
- service discovery with Cloud Discovery
- supervision with Cloud Tracing
- API gateway with new Cloud Gateway or older Zuul
Let’s generate a basic Spring web project.
Then we will add REST controller, at the beginning it will just respond with zero price.
package com.example.cloud.pricingservice.v1;

import com.example.cloud.pricingservice.v1.dto.PriceRequest;
import com.example.cloud.pricingservice.v1.dto.PriceResponse;
import org.springframework.http.HttpStatus;
import org.springframework.http.ResponseEntity;
import org.springframework.web.bind.annotation.RequestBody;
import org.springframework.web.bind.annotation.RequestMapping;
import org.springframework.web.bind.annotation.RequestMethod;
import org.springframework.web.bind.annotation.RestController;

import java.math.BigDecimal;

@RestController
@RequestMapping(path = "/v1")
public class PriceController {

    @RequestMapping(path = "/prices", method = RequestMethod.POST)
    public ResponseEntity<PriceResponse> getPriceAmount(@RequestBody PriceRequest priceRequest) {

        return new ResponseEntity<>(new PriceResponse(BigDecimal.ZERO), HttpStatus.OK);
    }

}
Start the project with
mvn spring-boot:run
Now we can test it with curl
curl -X POST -H 'Content-Type:application/json' -d '{"plan":"vip", "start": "2011-12-03T10:15:30+01:00","end" : "2011-12-05T12:15:30+01:00"}' http://localhost:8080/v1/prices
It would respond with
{"price":0}
Let’s assume we have a static configuration of daily prices per rental in yaml file, like:
plans:
   BASIC 10
   STANDARD 20
   VIP 50
We will replace application.properties with application.yaml as Spring supports both formats, and add the plans there:
server:
  port=8080

pricing:
  plan:
    basic: 10
    standard: 20
    vip: 50
Personally I find this format more readable than properties, but it’s a matter of taste. You can use properties if you like so.
In order to get these properties as a map in our application we need to write some code:
import org.springframework.boot.context.properties.ConfigurationProperties;
import org.springframework.boot.context.properties.EnableConfigurationProperties;
import org.springframework.stereotype.Component;

import java.math.BigDecimal;
import java.util.HashMap;

@Component
@EnableConfigurationProperties
@ConfigurationProperties(prefix = "pricing")
public class PlanConfig {

    private HashMap<String, BigDecimal> plan;

    public HashMap<String, BigDecimal> getPlan() {
        return plan;
    }

    public void setPlan(HashMap<String, BigDecimal> plan) {
        this.plan = plan;
    }

}
Now we have a spring-managed bean which we can inject to a service and calculate prices based on it. Let’s create a service class like below:
package com.example.cloud.pricingservice.services;

import com.example.cloud.pricingservice.config.PlanConfig;
import org.springframework.stereotype.Component;
import org.springframework.util.Assert;

import java.math.BigDecimal;
import java.time.Duration;
import java.time.ZonedDateTime;
import java.time.temporal.ChronoUnit;

@Component
public class PriceCalculator {

    private final PlanConfig planConfig;

    public PriceCalculator(PlanConfig planConfig) {
        this.planConfig = planConfig;
    }

    /**
     * Calculates price according to plans. The minimal unit of price calculation is one day.
     * If the rent time overlaps next day the whole price for another day is calculated.
     *
     * @return calculated price
     */
    public BigDecimal calculatePrice(ZonedDateTime rentStartDate, ZonedDateTime rentEndDate, String planName) {
        Assert.notNull("Plan name is required", planName);

        long exactDaysCount = ChronoUnit.DAYS.between(rentStartDate, rentEndDate);
        long daysCount = exactDaysCount + (isOverlappingNextDay(exactDaysCount, rentStartDate, rentEndDate) ? 1 : 0);

        BigDecimal pricePerDay = planConfig.getPlan().getOrDefault(planName.toLowerCase(), BigDecimal.ZERO);
        return pricePerDay.multiply(new BigDecimal(daysCount));
    }

    private boolean isOverlappingNextDay(long exactDaysCount, ZonedDateTime rentStartDate, ZonedDateTime rentEndDate) {
        ZonedDateTime exactEndTime = rentStartDate.plus(exactDaysCount, ChronoUnit.DAYS);
        Duration overlappedDayDuration = Duration.between(exactEndTime, rentEndDate);
        return overlappedDayDuration.getSeconds() > 0;
    }

}
Next, let’s update our controller and use calculatePrice method in it.
@RestController
@RequestMapping(path = "/v1")
public class PriceController {
    private final PriceCalculator priceCalculator;

    public PriceController(PriceCalculator priceCalculator) {
        this.priceCalculator = priceCalculator;
    }

    @RequestMapping(path = "/prices", method = RequestMethod.POST)
    public ResponseEntity<PriceResponse> getPriceAmount(@RequestBody PriceRequest priceRequest) {

        return new ResponseEntity<>(
                new PriceResponse(priceCalculator.calculatePrice(priceRequest.getStart(), priceRequest.getEnd(), priceRequest.getPlan())),
                HttpStatus.OK);
    }

}
If we now build and start the application again and execute the same curl command the result should be different depending on how many days the rental would last. E.g.:
curl -X POST -H 'Content-Type:application/json' -d '{"plan":"basic", "start": "2011-12-03T10:15:30+01:00","end" : "2011-12-05T12:15:30+01:00"}' http://localhost:8080/v1/prices
returns
{"price":30}
Now we have a sample REST API implemented with Spring Web and we can work on it in next post to transform it into Spring Cloud application.
comments powered by Disqus